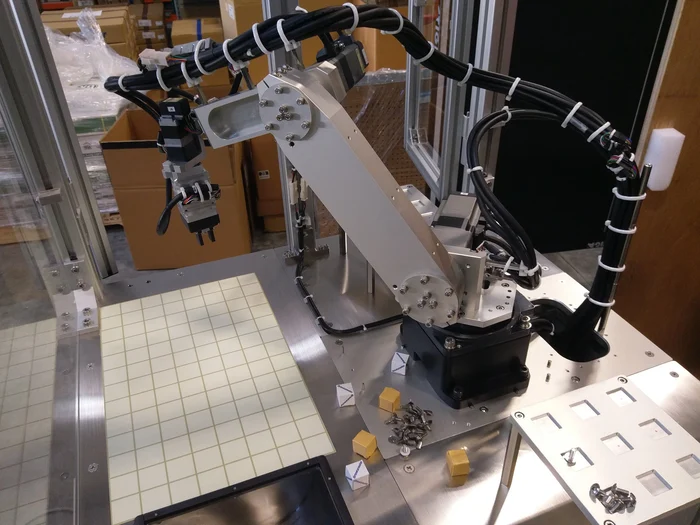
Building a robot may seem like a daunting task, but with the right planning and components, it can be surprisingly straightforward. As industries increasingly adopt automation to reduce costs and improve efficiency, creating your own robot can be a cost-effective solution. In this post, I'll walk you through the steps we took to build a 7-axis robotic arm, share some insights we gained along the way, and highlight how choosing the right components can significantly simplify the process.
---
### **Step 1: Brainstorm – Define Your Objective**
The first step in building any robot is brainstorming. This is where you define the purpose of your robot and what tasks it needs to accomplish. Whether you’re designing a simple pick-and-place machine or something more complex, sketching out your ideas is essential. For our robotic arm, we had to decide on the number of axes and the types of components that would best suit our needs. Should we use PNP or NPN sensors? Incremental or absolute encoders? Parallel or right-angle gearheads? Each choice comes with its own set of pros and cons, so it’s important to evaluate them carefully.
For instance, servo motors and stepper motors can both get the job done, but factors like speed, noise, and heat might influence your decision. Companies like Oriental Motor have been refining closed-loop stepper motor technology for years, offering a reliable alternative to servo motors in applications that don’t demand extreme speed. Additionally, researching similar projects can provide valuable insights into what components can be fabricated in-house. Always keep an eye on the total cost, including labor hours, to ensure your project stays within budget.
---
### **Step 2: Design – Visualize and Size Your Motors**
Once the brainstorming phase is complete, it’s time to focus on the design. This stage involves laying out all the necessary components and verifying their compatibility. 3D CAD models are incredibly useful here, allowing you to visualize the design and ensure all parts fit together seamlessly. Selecting a manufacturer that offers most of the required components—along with detailed CAD drawings—can save a lot of time and effort.
One critical aspect during this phase is ensuring that the selected motors are up to the task. Many manufacturers provide motor-sizing tools to help you find the perfect match for your application. At Oriental Motor, their engineers are always ready to assist with motor sizing, ensuring you get the most out of their products.
---
### **Step 3: Bill of Materials – Get Everything You Need**
With all the components confirmed, it’s time to create a Bill of Materials (BOM). Recording part numbers, quantities, prices, and lead times will help prevent costly delays caused by ordering errors. Double-check all specifications, dimensions, and lead times before purchasing, as even a single typo could result in receiving the wrong item. Don’t overlook seemingly minor components like mounting brackets or pre-made cables, as these can save you significant time. Buying extra quantities can also help mitigate risks associated with accidental damage.
A tip worth noting: some features can eliminate the need for additional components. For example, Oriental Motor’s AZ Series closed-loop stepper motors come equipped with a built-in multi-rotation mechanical absolute encoder, which retains position data even when powered off. This eliminates the need for external sensors, cables, or batteries.
---
### **Step 4: Build – Start Bottom-Up**
Once the components arrive, the assembly process can begin. Starting with the bottom axis is generally easier because it supports the weight of all other axes and handles moment loads. Installing the bottom actuator on a stable base allows you to build each axis modularly and test them incrementally. Some designers prefer assembling and testing individual axes before doing a full assembly, depending on their preference.
---
### **Step 5: Wiring – Keep It Organized**
Cable management is crucial for smooth operation. Poorly organized cables can lead to twisting, disconnections, or even connector damage, which could restrict the robot’s range of motion. Simple practices like using cable ties or tracks can make a big difference. Flexible cables are particularly useful in applications where the cable moves with the arm, offering a smaller bend radius and greater durability.
---
### **Step 6: Programming – Plan for the Unexpected**
Programming a robot can take longer than anticipated, especially if you’re unfamiliar with the software. It’s wise to allocate more time than initially planned. Using universal software or products from the same manufacturer can shorten the learning curve. For our robotic arm, we used a single software platform to program all the drivers, simplifying the process significantly.
---
### **Step 7: Testing – Anticipate Every Scenario**
Testing is where the real fun begins. Simulating potential scenarios ensures your robot performs reliably under various conditions. For example, what happens if two buttons are pressed simultaneously? Thinking like a user can uncover unforeseen challenges.
Our 7-axis robotic arm demonstrated excellent performance, as seen in the video below. We’re currently developing a new version with “mini†drivers, so stay tuned for updates at future trade shows!
---
By following these steps and leveraging the right components, building a robot doesn’t have to be overwhelming. With the right planning and execution, you can create a functional and efficient machine tailored to your specific needs.
For more information on how Oriental Motor’s AZ Series can simplify your robotics project, check out the links below!
---
**References:**
- [Learn More About the AZ Series](#)
- [Request a Technical Seminar](#)
---
This post highlights just a fraction of the possibilities when it comes to building your own robot. Let me know if you have any questions or need further guidance!
Bimetallic barrel refers to bimetallic screw and barrel, mainly used for processing engineering plastics, fluoroplastics, polysulfone, PPO special types of plastics, etc.
After more than 20 years of continuous development, Zhejiang jinteng
Machinery Manufacturing Co., Ltd. has become a famous production base
and supporting center of screw and barrel for plastic machinery in
China.
Bimetallic Screw & Barrel,Bimetallic Screw Barrel,Bimetallic Screw Barrel Material,Screw Barrel Material
Zhejiang Jinteng Machinery Manufacture Co., Ltd. , https://www.jintengmachine.com